Tuesday 27 December 2011

The Boil

Back in October I wrote a post about our mash tun, and how we “mash” grain to make fermentable wort. So I thought I’d continue by describing the boil process.

Boiling sterilises the wort, extracts bitterness from the hops and develops rich toasted flavours. Generally we boil for an hour using a Baby Burco that I bought on eBay, although some beers require a longer, 90 minute, boil.

So let’s start. After we’ve run our wort out of the mash tun (see the previous post), we transfer it to the Burco:

IMG_9932

The Burco is then turned on. As you can see (below), the wort produces quite a lot of foam to start with. We’ve had the odd boil-over because of this which is horribly sticky, so we generally watch it like a hawk at this stage.

IMG_9934

Hops are added at various stages during the boil. These impart three things to beer: bitterness, flavour and aroma. To extract the bittering oils from hops they need to be boiled for a full hour. The problem with this is that the more volatile flavour and aroma chemicals are driven off during this time, so additional hops are generally added towards the end of the boil – often at 10 minutes before the end (for flavours) and a couple of minutes before the end (for aroma).

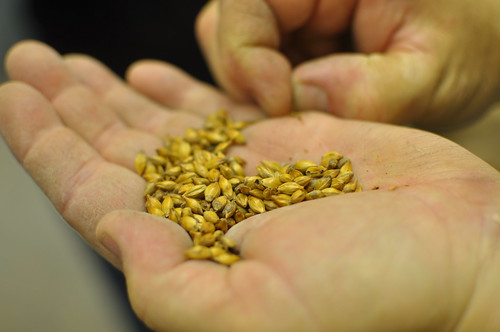
Hops can be bought in a number of forms: loose, compressed vacuum sealed and compressed pellets. Our hops come vacuum sealed and compressed, and look like this out of the pack:

IMG_9936

After carefully weighing them they are added to the boiling wort:

IMG_9939

The wort is boiled vigorously, which as you can see below requires careful monitoring. We generally drive off 15-20% of the water as steam – notice the way the wort has dropped down from the original scum line. Notice also how vigorously the wort is churning – it needs a good rolling boil:

IMG_9945

At the end of the boil the wort must be cooled to room temperature to allow the yeast to be pitched in and the fermentation commence. Cooling takes a hell of a long time, so it was not long before we invested in a wort chiller, which allows cold tap water to be circulated through the wort:

IMG_9947

Crash-cooling the wort in this way has another advantage in addition to saving time: it creates the “cold break”, which is the precipitation of some of the proteins in the wort. This happens at about 50C, and you can see little strands appear in the wort that look rather like Chinese egg soup. Getting some of the proteins out of the beer helps prevent hazy beer.

IMG_9949

During cooling we monitor the temperature:

IMG_9951

We also check the specific gravity (density). The denser the wort, the more sugars it contains, and the stronger the final beer will be. The density of the wort will be affected by the temperature (it gets less dense the hotter it is), and since our hydrometer is calibrated to be accurate at 20C we use some conversion tables I made to allow us to correct for the temperature.

IMG_9956

Back in the old days beer pump clips and bottles used to state the “Original Gravity” (OG) of the beer. If you remember back to those days you may have seen Marston’s Pedigree as 1.043, Theakston’s Old Peculier as 1.058 and Marston’s Owd Rodger as 1.080. This gives a guide to the strength of the beer, but it does depend on how much residual sweetness there is in the beer. Two beers with the same OG may contain considerably different amounts of alcohol if one is very dry and the other very sweet. This is why these days beer strength is required to be quoted in Alcohol By Volume (ABV), which takes into account both the starting sweetness and final sweetness.

The boil is complete and the wort just needs to be transferred to the fermenting vessel and the yeast pitched in. This stage is the only stage in beer making where the beer is treated roughly. Under all other circumstances you really need to avoid dissolving oxygen in the beer, because of the resulting oxidation and the off-flavours it produces. But to get the fermentation started you need the yeast to multiply. This reproduction needs oxygen and the boiled wort will have very little in it. So at this stage and only this stage, the beer is splashed about a lot to ensure plenty of oxygen dissolves. The way we do it is to pour the wort from the Burco into the fermenting vessel from a height:

IMG_9961

So that’s it. In goes the yeast and the beer (for once the yeast goes in we stop calling it “wort” and call it “beer”) is moved to a relatively warm place (18-20C) to ferment. Om nom nom.

Monday 26 December 2011

Side by side tasting: Axe Edge and Owd Rodger

On Wednesday we decided it would be a good time to have a first try of Axe Edge – our strong dark old ale inspired by Marston's Owd Rodger.

As luck would have it our friend Andy (another beer maker, but not Cheshire Peaks Andy) had had a similar idea – and he turned up with a bottle of Owd Rodger so we could do a side by side tasting.

If you really want to make your side by side tasting as fair as possible, you pour three beers: two of one beer and a third of the other beer. Then your tasters sample the beers blind and see if they can pick out which beer is different. If they can’t then you can safely say that the beer is “cloned”.

However, we weren’t really after attempting to clone Owd Rodger; Axe Edge is merely inspired by the classic Marston’s brew. And anyway, we decided to sample Axe Edge hand-pulled from the cask (although we had also bottled some), so comparing cask Axe Edge to bottled Owd Rodger was never going to be very fair.

So, enough wiffling, what were they like?

Colour: Both deep dark brown, but Axe Edge was noticeably darker.

Head: Rather unfair comparison: Axe Edge had a rich, thick, cream coloured head which lasted for ages. The Owd Rodger, being bottled, had very little head.

Aroma: Surprisingly similar – both sweet and malty, but the Axe Edge had a more intense aroma.

Flavour: Again surprisingly similar. Sweet, rich, malty, chocolaty and alcoholic. Frankly, both delicious!

Bitterness: Owd Rodger was more bitter. We agreed that on this one Owd Rodger probably had it right. Next time we make Axe Edge we will increase the bitterness by 10 IBU (International Bitterness Units – probably need to explain that one in another post!)

IMG_4337

Friday 23 December 2011

We’re stout, and we’re proud!

On Tuesday we brewed “Mow Cop Stout” – a stout to our own recipe formulation. If you’ve been reading this blog regularly (is anyone actually DOING that??), you’ll have noticed that we have been brewing a great deal of dark beers recently. This is probably the last in that line: we’re starting to think about slightly lighter beers for drinking in the new year. But for now, dark, dark, dark.

And boy will this one be dark! I’ve never seen such thick black wort running out of the mash tun. One of the most common ingredients in stouts is roasted barley. This has a very dark brown colour and imparts a burnt, coffee-like flavour and a dry graininess. A bit like a rather well known stout. We’ve added plenty of chocolate malt too, which will hopefully make it a slightly sweeter, richer beer than its well-known cousin.

One last boring beer-making observation on our brew day: we completely forgot to add any minerals to our water! Usually we would add gypsum (calcium sulphate), calcium chloride, magnesium sulphate and common salt (sodium chloride) in varying quantities in order to emulate the mineral content of the area from which our target beer style comes from. This helps to adjust the mash acidity (so it mashes correctly) and also assists in enhancing flavour. Generally speaking, chlorides will enhance maltiness (think adding salt to food as a flavour enhancer) and sulphates will enhance the bitterness. So in theory you should be able to adjust minerals to compliment your style… only this time we were in such a rush to “mash in” we completely forgot the minerals! So, we’re treating it as an experiment… can we notice any difference? Time will tell. Many brewers don’t bother with water treatment anyway, so whatever happens we hope we’ll get something drinkable!

One last thing – in case you don’t know, Mow Cop is a lump of rock that sticks up out of Cheshire south of Congleton. On the top is Mow Cop Castle, a folly built in 1754 by the owner of a local hall (Rode Hall) as a summerhouse and to give an interesting thing to look at on the horizon from his house.

MowCop

PS This time I managed to use my obscure Not The Nine O'clock News quote for the blog post title! See this post for why that matters!

Monday 28 November 2011

Axe Edge

I’d got it all worked out. We were supposed to be making Mow Cop Stout today. We’d designed the recipe, bought the ingredients, chosen the name and I’d even thought of a witty title for my next blog post (“We’re stout, and we’re proud!”)

Then Andy turned up brandishing a 1989 copy of Roger Protz’s Beer Almanac and waving the Owd Rodger page at me. We’ve been looking for a recipe for Marston’s Owd Rodger on the Internet for a while and had surprisingly little success. I don’t know why – there seem to be recipes for many many other well known beers out there. But not this one. And then Andy found the loosest suggestion of a recipe on Protz’s book: 73% pale ale malt, 10% crystal malt, 17% glucose; fuggles, goldings and “worcester” goldings hops.

So we quickly expanded that into a recipe we were happy with and luckily we had all the necessary ingredients. We got brewing.

For those that don’t know, Owd Rodger is a shockingly strong “old ale”. The original gravity is 1.080, which makes it about 7.6% ABV. Not to be taken lightly. In the old days we used to refer to it as the four horsemen of the apocalypse (because the fourth pint was death).

Anyway, today’s brew day went well, and we even came up with a suitably “dangerous” sounding name: Axe Edge. (And it’s even a Cheshire Peak too!)

Sunday 20 November 2011

Building up stocks for Christmas

It takes at least four weeks from brew day for a beer to be ready to drink, so November has been a busy time building up stocks for Christmas.

We started last Monday with Audlem Unusual, which is based on a well known “aged and strange” ale from Yorkshire. This is the third time we have brewed this beer, and we have not changed the recipe much from last time. It strong (about 5.5%), dark and malty. This time we have fermented it with Safale S-04 dry yeast, so we hope for a quick fermentation leaving a very clear beer. In a previous post I talked about the BJCP style Guidelines: technically this is categorised as an “old ale” by our American cousins, although I have never heard a British person use the term.

Audlem Unusual Pump Clip

After that, we are planning to brew our first stout. This will be the first time that we have completely formulated our own recipe from scratch. Obviously we looked at a load of stout recipes and considered the ingredients that are generally used. The most significant of these is roasted barley. This is unmalted barley that has been roasted until black. It gives rich chocolate and coffee undertones to a beer, as well as an extremely dark colour.

The working name for this will be Mow Cop Stout – yes, we’ve actually got the name of a Cheshire Peak in there! In fact we have also planned out a number of other beer names we plan to use (along with the style they will be), but in an annoyingly tantalising twist… that will have to wait for another post! :-)

In other news: we bottled the weizenbock last Friday. Bottling is a tedious process compared to putting the beer in a barrel, but it does have a few advantages. Firstly, I am hoping we’ll get a higher level of carbonation in the beer (which we think is important to the style: the dunkelweizen from the barrel was just a little too much like a flat British ale). Secondly, it gives you a whole load more flexibility in terms of being able to store it for longer and drink it over a longer period without tying up a barrel and worrying about it going off. The bottles are currently conditioning in the house before they go into cooler storage in the garage.

Tuesday 25 October 2011

Mash Tun

The brewing process has about four major stages:

  • Mix the malted grain with hot water and hold it at about 66oC for about an hour – this allows the enzymes in the malt to convert the starches to fermentable sugars and is called mashing;
  • Run the liquid off the “mash”, and run through more hot water to wash out all the remaining sugars. This is called sparging;
  • Boil the “wort” with hops for an hour or so. This sterilises the wort, extracts bitterness from the hops and can develop some rich toasted flavours (the maillard reaction, as in cooking);
  • Chill the wort, add yeast and ferment.

To perform the first step you need a “mash tun”, which is an insulated vessel in which you can hold the grain and water whilst the reactions take place, and which has a filter at the bottom so you can run off the liquid and leave the grain undisturbed – you don’t want to get particles from the grain into the beer because it will affect clarity.

The filter at the bottom of the mash tun is the tricky bit for home brewers – it’s not really a piece of equipment that you have hanging around in the kitchen. So before Andy and I could start all-grain brewing we had to make one.

You can buy fancy stainless steel mash tuns if you like, but a popular cheap option is to make (or buy) one from a cool box. I picked up the cheapest cool box I could (£12 from Tesco) and we set about attacking it with a drill.

IMG_9535

As you can see, we drilled through the inner and outer plastic and fitted a plastic tap which we then sealed with food grade silicone sealant.

Then we took a regular piece of copper pipe and some corner and T-pieces:

IMG_9536

We sawed slits in each piece of pipe to allow liquid to drain through. This fits together like this:

IMG_9537

This then fits inside the cool box with the slits downwards:

IMG_9538

That’s it really. We left all the pieces of pipe un-soldered to make them easier to take apart and wash. Also solder contains lead which we didn’t really want in our mash very much.

On brew day we fill the mash tun with the “strike water” – at about 75oC. We let this sit and warm the mash tun until it is down to about 72oC when we “mash in” – mix in the grain.

IMG_0492

After a quick stir and check of the temperature (which should now be 66oC to 68oC depending on our recipe) we put on the lid, wrap it all in a special high tech lagging device (sleeping bag) and leave it for an hour.

IMG_9542

After the hour we start running off the wort:

IMG_9544

And then “sparging” (gently pouring hot water onto the top of the grain bed) using another very high tech device from the diary industry:

IMG_9547

IMG_9548

And there you have it – five gallons of wort ready for boiling:

IMG_9550

Monday 24 October 2011

Weizenbock

Regular readers will know that we recently brewed a dark Bavarian wheat beer (a dunkelweizen), which we are currently still drinking and seems to be getting thicker and bananaier (is that a word?) by the day.

This was pretty successful and we skimmed some of the wheat ale yeast off during the fermentation. It seems a bit of a shame not to use that yeast before it goes off, so we looked into what other wheat beers we could brew. The obvious choice was a Weizen/Weissbier, but this is more a lighter summer drink. The other option was a weizenbock, which combines the dark flavours of a dunkelweizen with the rich strength and body of a German bock (a strong rich malty lager from Munich).

So that’s what we’re brewing on Friday. I picked up the wheat malt that the recipe requires from a homebrew shop today that I had not been to before. Slightly bizarre experience – the lad in there obviously didn’t know what malt is made from because when I asked for wheat malt he tried to sell me spray malt (which is dried malt extract). I said “no, wheat malt”. To which he said all malt is made from wheat (sigh, I reminded him that most malt is made from barley). But eventually he realised I wanted grain, and took me into the back which turned out to be a small brewery. The brewing gods had obviously smiled on me because there sat a sack labelled “Thomas Fawcett Wheat Malt”. Five minutes later I was off down the road with two bags containing totally un-weighed wheat malt scooped directly from the Fawcett’s sack. I assume I’ve got enough, but we’ll have to see on Friday!

Sunday 16 October 2011

Why does it have to be so clear?

We tasted the Dunkelweizen this week and we’re delighted with it. It has a deep rich complex malty flavour, and yes, those banana and clove flavours are noticeable (especially the banana, which Ian had a bit of trouble with!). In fact I’d go so far as to say it is pretty similar to the Erdinger Dunkel that originally inspired us.

If I’m being picky, there are a few “observations”:

  • It needed to be colder (we can fix that)
  • It needed more carbonation (we can fix that too)
  • Andy’s observation: “Why does it have to be so clear?”

On the latter one, we’ve been on a “quest for clarity” for a while now: many of our recent ales have been disappointingly hazy. As soon as we make a brew that is supposed to be hazy, it comes out clearer than our ales. Which does make me think our yeast might be the cause. We’ve used different yeast (Safale S04) in the Knutsford Brown Ale. It’ll be interesting to see if there’s any difference.

Tuesday 11 October 2011

Knutsford Brown Ale

Andy and I both (separately) encountered Burton Bridge Brewery’s Staffordshire Knot Brown Ale recently, and it reminded us how much we like this little-loved British style. The Burton Bridge example was delicious – rich, sweet, fruity and smooth. Everything you want to warm you on these shorter days.
So we set about planning our own version. Initially I looked at Jamil Zainasheff’s recipes in Brewing Classic Styles. It’s interesting how our American Cousins like to categorise things. They have an organisation called the Beer Judge Certification Program (BJCP), who seem to exist to categorise and sub-categorise beer. I thought brown ale was brown ale, but apparently there is Southern English Brown Ale and Northern English Brown Ale! The main difference is that Southern Browns have lower alcohol content and are significantly darker than Northern Browns. There are very few commercial examples of Southern Browns left – the only one I can find mention of is Mann’s Brown Ale. There are a fair few Northern Browns of course, such as Samuel Smith’s Nut Brown Ale, Newcastle Brown Ale and Wychwood Hobgoblin (although that last one surprised me). Incidentally the BJCP also classify Mild as a sub-category of Brown Ale.
Anyway, taxonomies apart, what are we going to brew? Well I toyed with the idea of brewing something close to Jamil’s Southern English Brown recipe, but annoyingly (maybe ironically) you can’t get all the malts needed for that recipe in the UK! In particular it uses a malt called “special roast”, which I cannot find in the UK – it seems to be made by one particular US maltster.
Then I found the basics of a recipe for the Burton Bridge Staffordshire Knot Brown Ale. It wasn’t all there, but there was enough to build our own version. And that’s what Andy and I brewed last night. We have high hopes that this will be a rich, malty and warming winter ale, and one that we can brew again and again.
Like the name, by the way?

Friday 30 September 2011

Munich Malt Experiment–Tasting

This week we finally had a proper taste of the Munich Malt Experiment beer. I have to confess we were a bit taken aback – not exactly what we expected.

Munich malt is used in many continental beers, and (hence the name) is common in beers from Munich such as Bock and Märzen.

Our brew was made with two thirds Munich malt and one third English pale ale malt. We fermented with a British ale yeast. So arguably it was a bit of an oddity, because we essentially used the grains of a German lager but fermented warm with a British ale yeast.

I was expecting a rich, sweet, malty beer. We got that. What I wasn’t expecting was a strong aroma and taste of orange! It’s like it has been aged in Southern Comfort barrels! I’ve scoured the Intertubes looking for any comments on the flavour of Munich malt, and they all talk about giving a deep, rich malty character. No mention of orange!

I suspect that given this un-seasonally warm spell we were drinking it much warmer than we should. I might pop the barrel in the fridge and we can try it again at lager temperature.

In other news, we put the Dunkelweizen into barrel this week. In Bavarian wheat beers you would expect a certain amount of fruity banana and cloves flavours – characteristic esters given off by the particular strain of yeast used. You have to use the right yeast, so we chose Wyeast 3056 Bavarian Wheat Blend. This should be used “when a subtle German style wheat beer is desired.” Compare this to Wyeast 3068 Weihenstephan Weizen, which gives “banana esters and clove phenolics”.

We fermented the beer in the understairs cupboard (to keep the temperature a little lower), and towards the end of the fermentation every time I opened the cupboard I got this unmistakeable waft of banana. A quick taste when we put it in the barrel confirmed – no shortage of the banana flavours. High hopes for this one – should be interesting.

This has certainly been a very fruity week.

Friday 23 September 2011

Brewing Dunkelweizen

Brewing the Dunkelweizen went well on Monday, although it did seem to take us quite a long time. We started at 4pm as we usually do, but it was after 10pm when we were finished and cleaned up. This was partly due to the 90 minute boil and partly, I think, due to the masses of different malts that each had to be weighed out.
When we brew an English ale we boil the wort for 60 minutes. This achieves the following:
  • It extracts the bittering oils from the hops;
  • It sterilises the wort – malt is covered in bacteria so if you didn’t sterilise it the yeast would have a hell of a fight on their hands;
  • It develops some of the richer “cooked” flavours - the melanoidins from the Maillard reaction: same as when you cook food (imagine microwaving a steak rather than frying and you’ll get the idea).
So why a 90 minute boil for Dunkelweizen? Well the recipe uses some pilsner malt, which is very lightly kilned. These lightly kilned malts contain DMS (dimethyl sulfide), which can give the beer the taste and aroma of canned sweetcorn. You need a longer boil time to be sure to drive it all off, apparently.
And as for weighing out all those malts, well the photo speaks for itself:
IMG_9540
Dunkelweizen needs to be fermented a little cooler than an English ale – ideally 17C. So it’s currently in the under stairs cupboard sputtering yeast all over the place!
IMG_9553

Saturday 17 September 2011

Dunkelweizen

A few weeks ago Andy and I tried a Dunkelweizen – a Bavarian dark wheat beer. It was stunningly delicious! (Andy will disapprove of my hyperbole there: we were not actually stunned; maybe “maltily tasty” would be better?).

Anyway, exaggerations apart, it was a really good beer – a rich malty aroma and a warm toasty malt flavour with no bitterness. Really satisfying to drink. The sort of beer you could just accidentally drink the whole glass of before you realised it.

So… we’ve decided to set about making one on Monday. Obviously the malts are very different to British ales. It goes without saying that much of it is wheat malt (53%), followed by some munich and lager malt. There’s also some specialty malts to add a caramel sweetness: Special B, Crystal and Carafa I.

IMG_9513

We’re not using our regular British Ale yeast for this brew; it requires a Bavarian Wheat yeast, WYeast 3056 to be precise. I made the starter for this last night:

IMG_9512

Thursday 15 September 2011

What's in a name?

A couple of friends on Facebook said to me recently "Err, Cheshire Peaks? There aren't any peaks in Cheshire!".
My response was that Cheshire is not totally flat (they must have been thinking of Norfolk). There are a few notable peaks in Cheshire, although none of them are very high. But yes, we did decide to use the name Cheshire Peaks for a laugh. "Ah, right.," replied my friend Pete, "Irony."
There are some wonderful peaks in Cheshire, both out on the plain and in the foothills of the Peak District:
  • Shutlingsloe
  • Bosley Cloud
  • Alderley Edge
  • Beeston Castle
  • White Nancy
  • Shining Tor (highest point in Cheshire, 1834 ft)
  • Beacon Hill (aka Frodsham Hill)
  • Tegg's Nose
  • Peckforton Hills
  • Axe Edge
  • Bosley Minn
  • Sutton Common

Sunday 11 September 2011

Porter Tasting

After the outrageous cliff-hanger in my previous blog article, I’m going to discuss what the porter that we brewed in June tasted like.

We followed the Fuller’s London Porter recipe in Brew Your Own British Real Ale by Graham Wheeler. In this he describes the brew as a “rich and flavoursome dark ale based on an 1880s Fuller’s recipe…hints of coffee and chocolate…long complex finish…and liquorice maltiness”.

It tasted interested when it finished fermenting – certainly dark, complex and roasty. We then spent a whole evening bottling it in hopeful anticipation.

A week or so later we allowed ourselves to try a bottle – bitter disappointment. It had hardly any carbonation, and tasted flat and almost oily.

So I left the bottles on the shelf and forgot about them for a couple of months. Here we are in September and we opened a bottle this week to see if anything has changed. What a difference a couple of months maturing makes! Firstly, the beer had carbonated, so we got a 1cm or so of fizzy head. This didn’t last long, but at least it was there and the beer had a delicate carbonation that lifted the heavy flavours out of the glass.

The aroma smelt enticingly of cocoa.

As for the taste – as we expected, complex, malty, coffee and chocolate. And a deep long aftertaste. But also in there was a tartness which kind of helped cut through the chocolate and coffee flavours.

Bump, back down to earth: I wouldn’t call this the most amazing porter I’ve ever tasted, but given that we’d been so disappointed just after it had been bottled we were pretty pleased.

So, two learning points here:

  1. Maturation is everything. Don’t write a beer off until it’s had plenty of time to mature.
  2. Carbonation really lifts a beer. Without it (no matter how small) a beer is pretty unpalatable.

IMG_3681

Thursday 8 September 2011

Porter

Back in June Andy and I made a porter which we planned to bottle and mature for the winter. We tasted a bottle yesterday to see how it is coming along.

Porter is an interesting beer style, most notable because it was the first beer style to be “designed” (rather than just sort of come about over time). Let me take you back to London in 1722. Back then it was very common for the beer drinking working masses to mix fresh and stale beer – I’m not sure whether this was because it was cheaper or because they preferred the taste. Perhaps the stale beer added a pleasing tart edge to the brew (but you wouldn’t choose to drink it neat).

Anyway, enter George Harwood of Shoreditch Brewery. He came up with the idea of engineering a beer for the London workers that tasted like the mixed beer but saved the publican the time by allowing him to only dispense from one cask. Porter was born, reputedly named after the London porters that drank it. It was a massive hit and very soon was being brewed on an industrial scale.

My favourite tale from the story of porter is of the 1814 disaster at Meux. Porter used to be aged in huge vats, some of the largest of which contained approaching a million gallons (yes, really). On 16th October 1814 a 22 foot high vat of porter ruptured. The jet of beer ruptured a further vat and beer flooded the surrounding five block neighbourhood. At least eight people were killed (including women and children) and dozens were injured – crushed by the crowds attempting the consume the fine beer before it soaked into the streets.

Anyway, enough of the history lesson. What’s modern porter like? Well there are actually various different styles of porter: brown porter, robust porter, Baltic porter. We decided to make a London Porter, which I think is in essence a brown porter.

What should it be like? Well obviously colour-wise it is deep deep brown or black, and you’d expect a cream coloured head. It will be fairly strong – 5% – 6% ABV. Taste-wise, you’d expect rich dark malty flavours, giving slightly roasty flavours as well as coffee and chocolate. This is not a session beer, it’s a complex, rich, bold brew with a long lasting aftertaste.

And what was our porter like? Well there’s a bit of a story there, and you’ll just have to wait until the next post, because this one is already long enough! :-)

Friday 2 September 2011

Red Willow Meet the Brewer

I was lucky enough to catch the “Meet the Brewer” session at the Bollin Fee in Wilmslow last night (lucky because I happened to be in the Fee for some other reason as it happened). The session was with Toby from Red Willow Brewery in Macclesfield.
The Fee had a large number of Toby’s beers on: Wreckless, Mirthless, Ageless, Smokeless and Headless. In addition to trying the beers I was able to sit in on Toby’s informal presentation which was fascinating. He was passing round hops, handing out tastings and showing some of the other wacky things he puts in his beers, such as the chipotles (smoked Mexican chillies) that go in Smokeless (smoked porter).
I have to say I am hugely impressed with what Toby is doing – he only started brewing commercially last November and he has already won various awards (such as winning the beer competition at the Mark Addy in Manchester, for which Red Willow will now be the house beer for the next year). Not only does Toby produce top quality regular ales (try Wreckless or Mirthless and you’ll understand what I mean) but he’s also not afraid to try some pretty wild new things such as adding the chipotles, making stout with real oysters and making a Thai beer with no hops – just bittered with Thai spices such as tamarind and lemon grass.
One other thing that I got to try was Ageless (outrageously hoppy 7.2% Double IPA) from both the cask and bottle, side by side. This was fascinating, and not something you’d normally be able to do. Guess what? They were utterly different, like they weren’t the same beer. Not surprisingly the cask was far better – smoother, better aroma and much less gassy.
You can follow his blog here. Seek out his beers, you won’t be disappointed!

Wednesday 31 August 2011

Munich Malt experiment

We're up to brew number 18 at Cheshire Peaks. Most of our early brews were aimed at getting the hang of the all-grain brewing process, and for those we followed recipes (mostly from Brew Your Own British Real Ale by Graham Wheeler).

But since we've been at this over a year now we decided it was time to branch out, and make our own mistakes. We really wanted to start getting a feel for the characteristics of some of the specific ingredients of beer. Recently we made a couple of ales that were hopped with a single hop: Cascade followed by Nelson Sauvin. These were interesting (although we had a huge issue with clarity of the Nelson and we don't yet know why).

So... to malt. Previously we've just used the "classic" malts used in British Real Ale - pale ale malt (usually maris otter), crystal malt, and a little bit of chocolate and black malt. But there are many other malts out there with their own characteristics, which brought us to munich malt.

Munich malt is used in European beers - both ales and lagers. It's a darker grain than pale ale malt, because it has been kilned for longer. So what we are expecting is a darker, maltier and sweeter beer than a traditional British bitter. We've held right back on the hops as well to keep the bitterness low.

We used two thirds munich malt to one third pale ale malt and a little bit of Kent Golding hops during the boil. (I'd post more on the details of the recipe, but I've tagged this post as "General"!)

At the moment it's busy fermenting, and I'll post details of the results when it's ready to taste.


Tuesday 30 August 2011

Blog audience

Hmm. I'm scratching my head a bit about who the intended audience is for this blog.

I'd like to write articles about the technicalities of brewing, because at the moment that's what light's my candle. But the reality is that if anybody does read this blog it's more likely to be friends and family (at least initially!), and you are probably not going to care about mash temperatures and BU/GU ratios.

Maybe I'll look at using the "labels" facility. I'll start with:
  • General - of general interest to people that know me, and not full of brewing technicalities
  • Technical - boring technical brewing stuff that no one will want to read

Monday 29 August 2011

Welcome to the Cheshire Peaks Brewery blog!

Welcome! I've set up this blog to record the various activities of the Cheshire Peaks Brewery, a home brewery based in, err, Cheshire in the UK funnily enough.

Before I start though, let me make one thing very clear: this is not a commercial brewery. We may have a nice name (well, we like it anyway) and maybe even some names for our beers, but this is a home brewery and our beers are not available to buy. I thought I'd better make that clear from the outset - don't want anyone chasing us for excise duty! If you want to taste our beers you'll have to know us personally. And be nice to us.

So as far as introductions go, that's about it really. Anything else that appears on this blog will be as the mood takes me. Today we've been brewing an experimental ale based on munich malt. Basically because we've not used it before and we want to get our heads round what it tastes like. If you're lucky I will write a post on how we made it and what it tastes like. If you're unlucky I'll write several posts about it!

That's all for now.